
I played 1914 Nach Paris in something of a frenzy over the month of March and early April. Finishing a game one evening, setting up the next scenario and playing that the following night. It dominated my little gaming corner, pushing everything else to the edges. Night after night I struggled to learn to swim in this complex operational hex and counter game about the opening weeks of the Western Front of World War I, designed by Bertrand Munier and published by Vuca Simulations. That I played this so many times should give some indication about how much I’ve enjoyed my time with 1914: Nach Paris but this is a huge box and there’s a lot to unpack, both literally and in terms of the experience it offers. I hope you’ll bear with me for what will prove to be a meandering review through the pre-trench warfare of 1914 Northern France.
Vuca Simulations kindly Provided me with a Complimentary Review Copy of 1914: Nach Paris
On Reviews: Or How Much Play Is Enough?
A question that I suspect most reviewers have asked themselves at some point, and many have been asked by others, is how do I know when I’ve played a game enough to review it? I also suspect that for many people, myself included, the answer is “I just do”. I could set myself a goal of a minimum number of plays of game but, especially in the wargaming side of the hobby, playtimes vary significantly between games. I wrote a very lengthy review of hex and counter classic Manassas after only one game. That game took me twelve hours, though, and in terms of time investment far outlasted the half a dozen or so plays I had of The Shores of Tripoli when I wrote my review of that game. More than time, though, it’s really a matter of when I feel like I have sufficiently experienced what a game has to offer and have formed my thoughts about that that experience sufficiently that I think I can express them in a coherent fashion. 1914: Nach Paris has posed something of a challenge to me in this regard.
1914: Nach Paris ships with twelve scenarios in its box and it is clear that much love and attention has been given to each of these scenarios. However, it is also clear that this is a game built first and foremost for its final scenario. Scenario 12 uses all four maps that come in the box, covers every turn on the track, and is very clearly the foundation for the entire game. There are more than a few rules which only have a significant impact on the game when played at this scale. However, this full campaign game takes up far more space than I have and requires an estimated 27 hours to finish. I am not in a position to play this scenario.

I did once lay out all four maps on my floor just to look at them because they’re so pretty. Unfortunately, I have no hope of actually playing the game like this!
I have, at time of writing, played almost every other scenario in the box. I have played scenarios one through nine and I dabbled with scenario ten. 1914: Nach Paris will very likely be among my most played games at the end of the year even if I don’t play it again after this month. By any reasonable metric I have played this game enough to share my thoughts on it - and I very clearly am doing that because you’re reading them right now. At the same time I feel like I’m not quite reviewing 1914: Nach Paris.
I am reviewing the game that I believe most people who own 1914: Nach Paris will play - I suspect I am not alone in lacking time and space to play Scenario 12 but I can still find significant joy in the game’s other, smaller scenarios. At the same time, I’m not sure I’m reviewing the game that Bertrand Munier designed - or at least not the whole of it. That’s not likely to change, at least not imminently. Maybe someday I will find the time to play Scenario 12 in all its glory and detail, and maybe I’ll write about that experience here, but in the meantime I am reviewing either seen most or only a fraction of 1914: Nach Paris - depending upon how much weight you give that final scenario.
The Weight of a Counter
1914: Nach Paris is the most complicated hex and counter game I’ve ever played. That’s not to say it is anywhere near the heaviest hex and counter game out there - far from it - but it is decisively within the broad category of “heavy hex and counter game”. There are a lot of rules in it many of which I still struggle to remember even after nine games. I’m still not entirely sure I understand how the railroad movement rules work. It is also an eminently playable game, and I don’t think this weight should scare people who are prepared to embrace the kind of game this is.
I will discuss this more elsewhere in the review, but 1914 does a great job at teaching itself to you. The rulebook, except for it’s somewhat excessive use of acronyms, is very well put together and easy to read and reference. The game’s many smaller scenarios help you to ease into its mechanics. It is also very playable even if you only understand around 70% of the rules. I’m going to make a confession and say that there are definitely times I missed rules or just chose not to double check something and kept playing and had fun. There aren’t any wargame rules police out there waiting to crash through your door, getting rules wrong is as much a part of this hobby as counter clipping! For that reason I think 1914 is a very good entry point into heavier hex and counter games for those who are interested in that kind of thing.

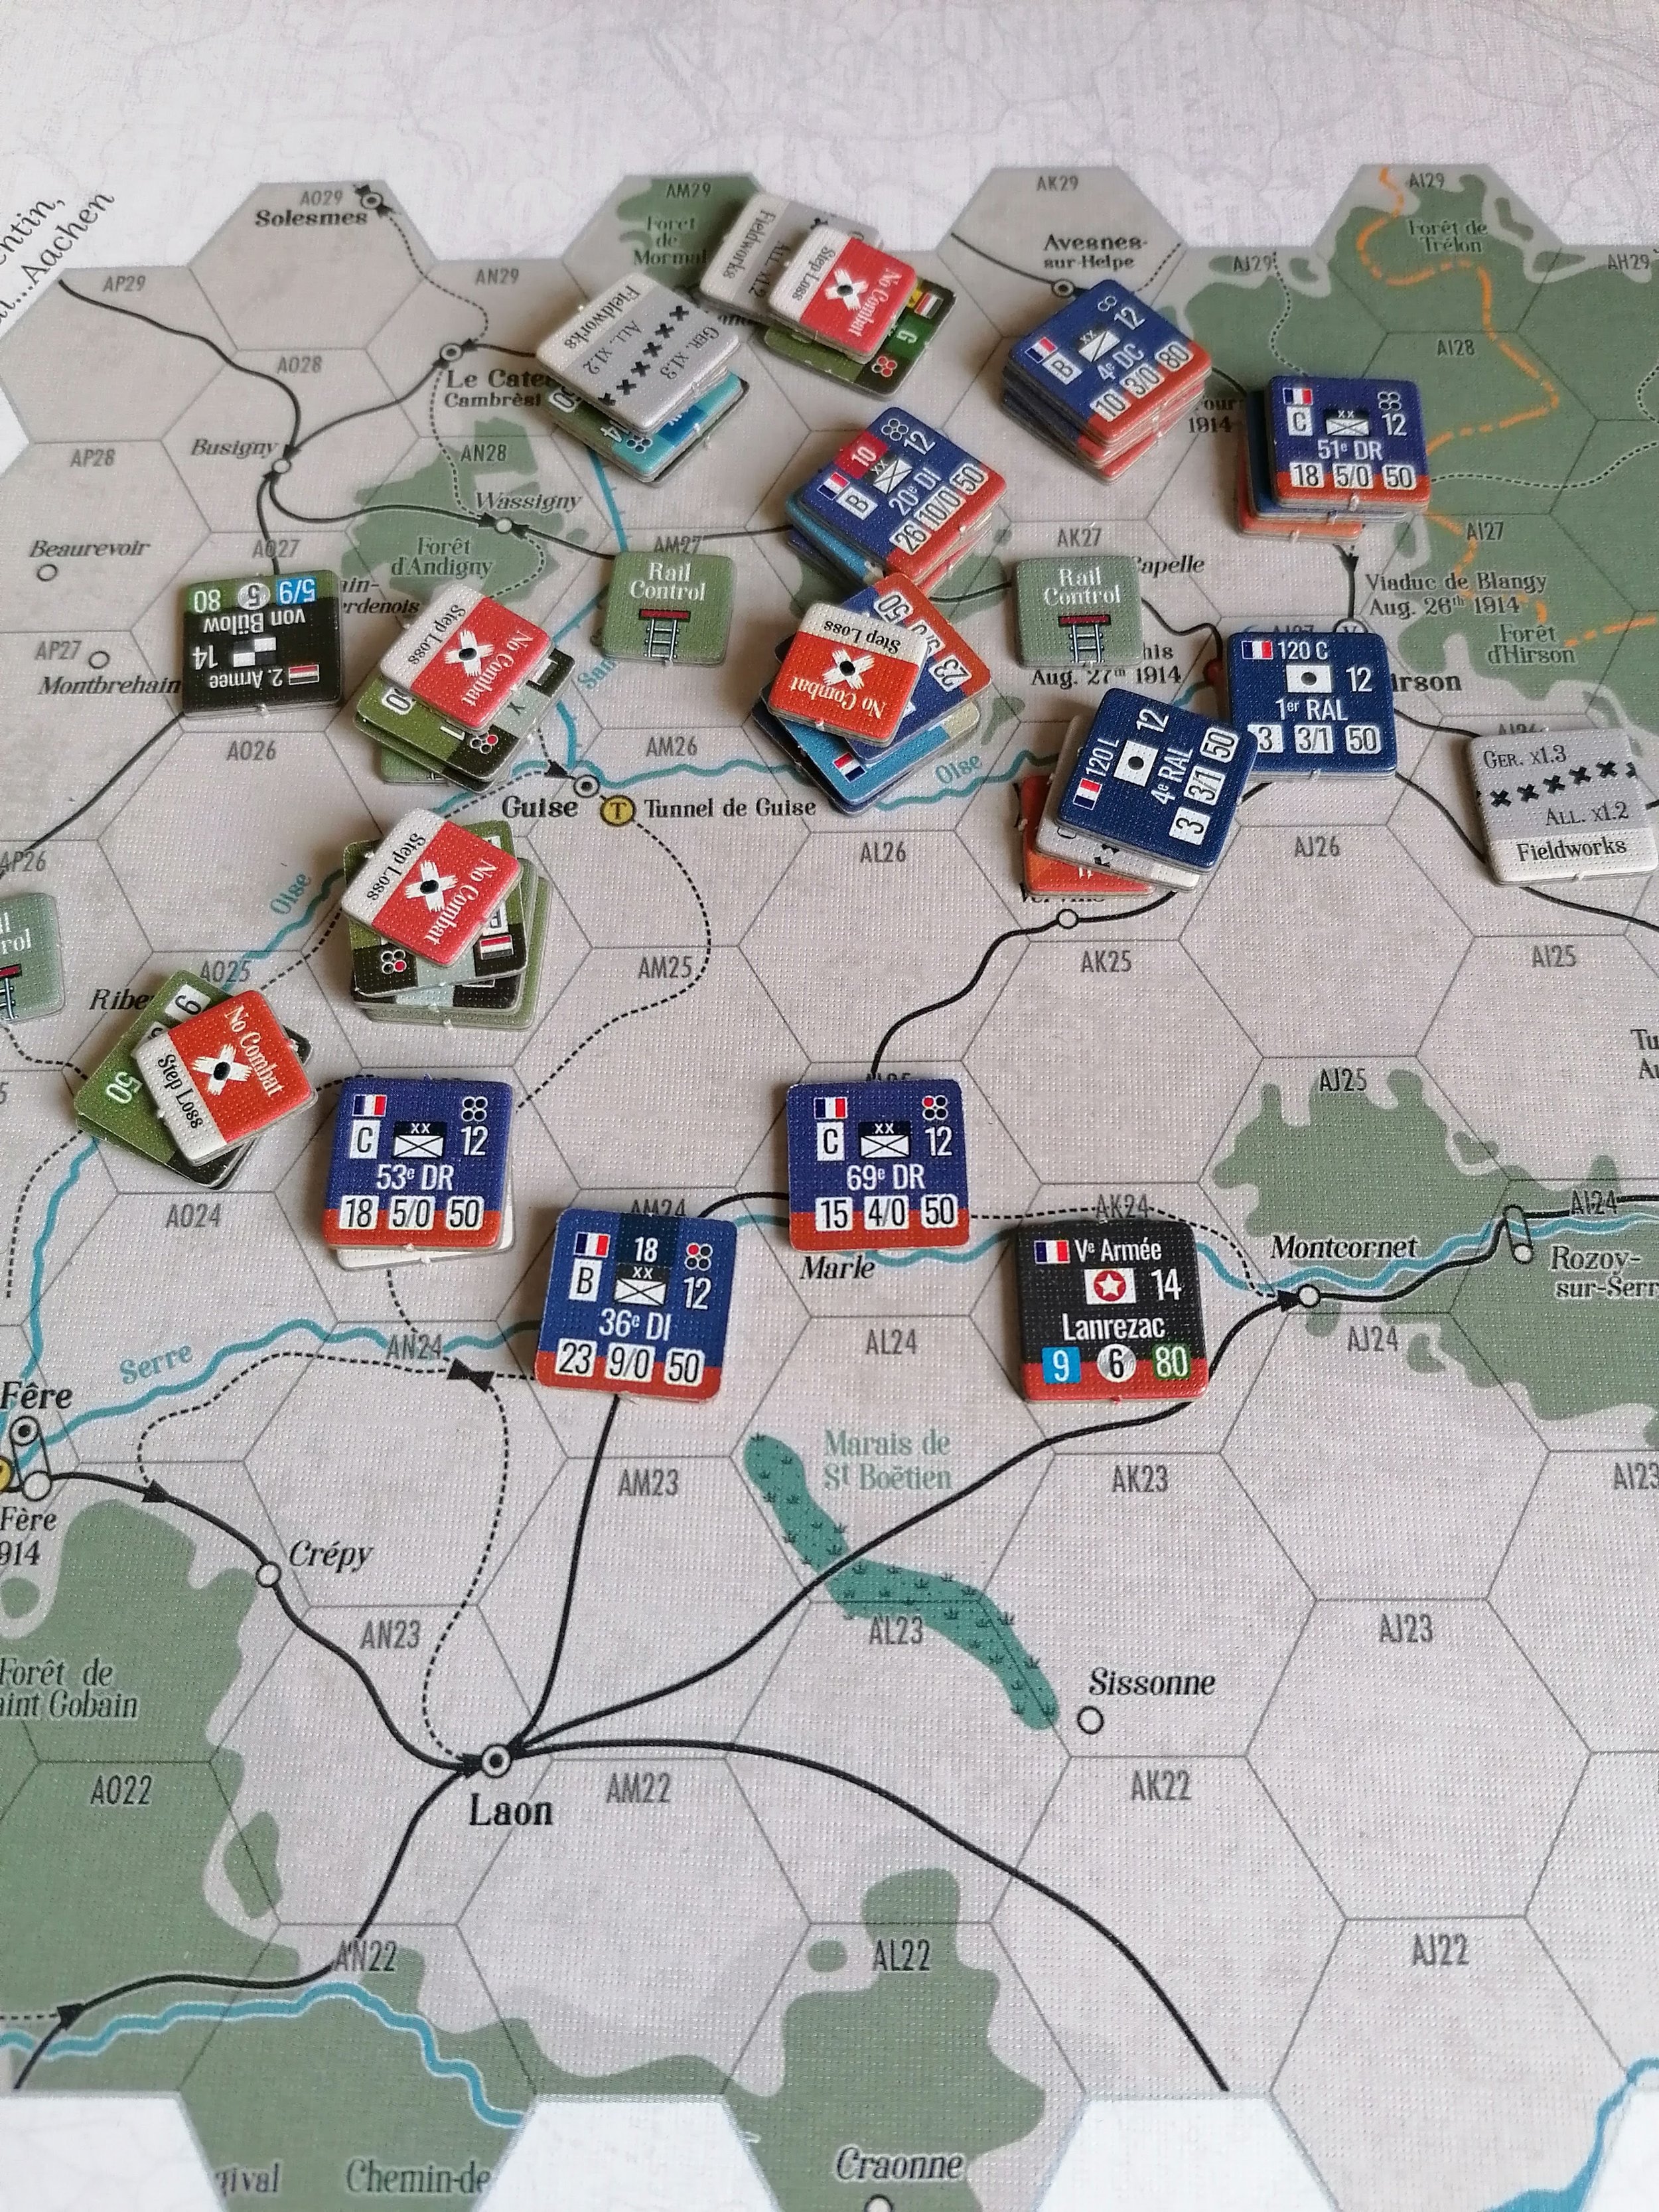
An example of my play area set up for the physically largest scenario I played - this one used a section of two of the map sheets and you can also see the turn track, the order of battle chart, my dice tower, and the counter tray I kept all the status effect counters in. It was a lot to take in and keep track of!
I’m emphasising that last point because I want to be as clear as possible that this is not the kind of game that will convert people who do not like hex and counter into raving fanatics of this niche. This is a big ol’ game of hexes and cardboard chits and if that type of game hasn’t interested you so far this will not be the one to change your mind. However, for those, like myself, who have enjoyed lighter hex and counter systems this is a great way to try out something a little heavier and see how we feel about it.
On a very relevant note - I found 1914 to play amazingly well as a solitaire experience, particularly in the smaller scenarios. I suspect I would find the largest scenarios overwhelming were I to tackle them on my own, but the many smaller scenarios that come in the box are great. In many cases only one side is tasked with attacking, so the decisions are primarily made during their activations while the other side is mostly reactive. This creates a fairly easy solitaire experience and one I found quite enjoyable. I did play 1914 with a friend and I enjoyed it, but I was also content spending 90% of my time with the game on my own. Especially when learning a system like this, it really removes a lot of the pressure when you are the only one at the table.
I really want to praise the scenarios included in the box for 1914. There are four A4 sized pieces of cardstock that each have two map sections on them (one on either side). These correspond to 8 scenarios included in the game which only last a few turns and use a relatively small number of counters. I’ve seen games that include a small scenario or two in their box before, but 1914 offers an abundance of this kind of content, more than I’ve ever seen before. These scenarios are fun little puzzles that also help you learn the game in bite sized chunks.

Look at this cute little starting scenario! It dilutes the experience down to a manageable few turns to help you learn how the game works.
If there was one thing I wish they did better, it would be to offer some guidance on what mechanisms they are generally teaching you. For example, it is clear that some scenarios are intended to teach you about assaulting fortifications and I would have loved a little note saying something like “We recommend you read p.xx-xx of the rulebook to revise rules X.X as you will be using them a lot in this scenario.” It’s not a deal breaker that this isn’t there, I could figure most of it out for myself, but I think that extra guiding hand could have been helpful in a few places. Overall I was really impressed with the design of these scenarios. They didn’t feel like an afterthought and were optimised for being easy to set up and play without taking up too much time or space. It’s no exaggeration that you could play these on a coffee table during your lunch break.

A few scenarios later, things are a bit more complicated but by the time you get here it doesn’t feel like a big deal. They’re also generally more fun as you progress, as they throw more decisions at you and present more options.
Combats, Results, and Tables Oh My
When I first saw the CRT and read through the rules for standard combat I thought it would be completely overwhelming, but in practice I found it surprisingly quick to resolve and utterly engaging. The most complex part is calculating the initial odds ratio. I’m not good at odds at the best of times, and with the large and varied numbers involved this was absolutely a job for the calculator on my phone. After that, though, it moves very quickly. You roll a d20 and then the various combat modifiers are added or subtracted from that die roll - not from the unit strength during the previous calculation. This gives the combat something of a D&D feel, which certainly appeals to me but also makes it pretty quick to resolve and, importantly, much easier to process. Knowing how a +X modifier might affect a ratio can be something of a head wrecker, but knowing that attacking over a river is going to add +12 to the final die result is much easier to parse - for me at least. Once you’ve done all the math you end up on a row of the CRT with different results for attacker and defender, which are very easy to read thanks to some excellent graphic design on the CRT.
While one side may or may not take a step loss, in almost all cases everyone in the fight will have to take a CAB (Combat Ability) test, usually with a modifier. Each infantry unit involved in the combat will need to roll under its modified CAB stat on a d20, starting with whichever side has the worse modifier on the CRT - this is important because the first side to take a loss will be the side that has to retreat each damaged unit. This can involve a lot of dice rolling in a big combat, but I found it consistently engaging and I really liked how it randomises who will be taking losses. Because every fully committed unit will have to test, it is possible for a superior force to suffer more losses against a small force - even if they still drive them from their position. Pyrrhic victories are not inevitable, but they are a very likely possibility in this system - and hard to predict! I really looked forward to resolving each of these combats, and there are lots of interesting little modifiers that factor in to deciding when and how to attack.
Another fun wrinkle is that if you take a step loss you can’t attack the next turn - or the next two turns if you take two step losses. This means that very aggressive play can be rewarded by stopping any potential counter attack - assuming your opponent doesn’t have reinforcements to bring up to attack your (potentially) newly weakened units!
For example, units have quite high movement factors - you can cover a lot of ground in a single turn if you set your mind to it even before factoring in the railroads. However, if you use more than 50% of your movement you suffer a penalty on any CAB tests that turn, and an even greater penalty should you use 100% of your movement or make a Forced March. This means that bringing up troops to the front and launching an attack that turn is pretty risky - they will still be as effective in combat as if they hadn’t moved, but they are more likely to take losses in the aftermath. The CAB penalty also reduces their ability to build defences. Marching a long way can be risky, but at the same time it may be essential to your victory!
I also like the slight asymmetry in that the Germans (and British) have the ability to declare only some of their units as participating in an all out attack, the rest filling a supporting role. The supporting units add less to the overall combat but are spared having to make CAB tests or take step losses from the CRT. This allows them to play a little more conservative. In contrast, the French must always all out attack, throwing everything they can at the enemy. This likely reflects specific war doctrine, but I think also captures the feeling of the French throwing everything they can at repulsing or stopping the German invasion of their home. It’s a lot easier to follow a conservative war doctrine when it’s not your land being fought over!
The Misery of a Siege and Railroads are confusing
In contrast to the regular combat, I don’t particularly care for how attacking fortresses works. The rules for launching an artillery bombardment against enemy units are pretty straightforward - total up your artillery factor, roll in that column of the CRT, add any modifiers to the die result, do what the roll tells you. Bombarding enemy fortresses works similarly except that there’s a completely different table and your column will differ based on the type of fortress you are bombarding. You can also launch a joint assault plus bombardment, which is highly effective but also significantly more complicated. This system isn’t bad, but given how small a part of the game fortresses are in practice it felt like a lot of rules overhead for relatively little reward. I didn’t hate these rules, but I was not really engaged when playing the siege focused scenarios and I just wanted to get back to the more dynamic regular combat. In my ideal world, this would be an area for the system to be simplified because I felt like (for me) the extra complexity wasn’t worth it in terms of the game experience.

The fortresses are also the only place where the counter stacking gets a little out of control. Just look at those towers in Antwerp - this is the game that finally made me buy tweezers. Outside of these fortifications I could get by without them.
Another area where the complexity left me adrift was the railroad rules. This one had far less of an impact on my enjoyment of the game because when playing the smaller scenarios you rarely if ever have to actually use the railroads. However, it could potentially be a barrier when I finally manage to play one of the final two scenarios - something I still hope to do. On the larger maps moving your troops by train will be essential and I have to confess that I still don’t fully understand the train rules. This isn’t so much a critique of them as being negative play experience or anything. It’s more that I just don’t understand them after 10 games, which doesn’t feel like a great sign for either me or the game, or both. The rulebook includes many examples, so it isn’t like they aren’t trying their hardest to teach me the rules, and maybe it’s just that since I’m a medievalist my lack of experience with train rules in games is causing more confusion than it should, but this definitely feels like a huge barrier to me teaching someone else to play a larger scenario with me. That said, if you just play the smaller scenarios you can almost ignore these rules, so it wasn’t nearly as much of a barrier to my enjoyment of the game as the siege rules.
The Games The thing
As the photos scattered throughout this review have hopefully made obvious, this game is very pretty. While I’m no great fan of NATO symbols on counters, even I must admit that they are necessary here given how much information is on each one. However, the graphic design does a great job at making them still relatively attractive to look at even given how busy they are with tiny numbers. The maps are gorgeous and overall the production shows an amazing attention to detail. It would be too easy to make a heavy hex and counter game like this be quite ugly - and the wargaming market has shown that there are people who would buy it anyway - but the thing that attracted me to Vuca Simulations in the first place is their dedication to the physical appearance of their games and this is a great example of that. In an age of video games I think heavier wargames have to do that little extra to justify their existence. A computer can handle all of the complex math far faster and more easily than I can, so why would I choose to do it manually? A large part of the appeal of playing a tabletop game is the physicality of it and I think Vuca understands this and it is reflected in their games.
One touch on the counters that I love is the differentiating of divisions and uniforms in their colouring. It helps to remind you of rules, like how the French and Belgians have a negative modifier in combat because their flashy uniforms make them easier targets. It also helps to subtly highlight the presence of colonial troops with their distinct uniform colour, an aspect of the war that is incontrovertible and yet has been actively denied by racists and reactionaries in the recent years.

The 8th scenario, which uses the main maps, is a great showcase for the game’s art and for the differing aesthetics of the counters. The light blue of the North African divisions really pop and are a particular favourite of mine.
Beyond just the aesthetics, there is a lot of amazing production on display in 1914. For one thing, the choice to include 4 double sided card stock maps for the smaller scenarios instead of having you mark off parts of the larger maps greatly boosts the playability of those scenarios. I rarely have table space to be unfolding a huge map onto, but those little A4 sheets are easy to fit anywhere. There’s also just a lot of content in this box: twelve scenarios, a thousand counters, four large maps and eight small ones - it’s a lot of game! You could play this for a long time.
I am not without critique of the production, though. In amidst all those counters I did feel like something was missing - victory markers for smaller scenarios. Several of the scenarios use a victory condition where one side must occupy one or more of a set number of hexes. Nothing on those hexes marks them as victory points - which makes sense as the art is the same as on the larger maps. However, there aren’t any markers in the box to use as reminders for which hexes you are trying to capture. I ended up using the Fog of War markers, of which there are many for use with an optional rule I never played with, for this purpose, but given how much attention to detail there was elsewhere in the production I did notice the absence of dedicated counters for these scenarios. It’s a very small thing, though, and as I said there is a ready workaround available in the fog of war counters - although that might not work should you try and use the Fog of War rules for one of these scenarios!

Here you can see my proxy fog of war symbols - the counters with the question marks - helping me track the German victory spaces in a rather busy small scenario.
There Can Only be one
With my recent play of Manassas I have come to increasingly admire games that dedicate their sole effort to really capturing one specific historic event, bit a battle like Manassas or a campaign like 1914 Nach Paris. The design of 1914 is specific to this year of the war and even this specific part of that year. It is not intended to be turned into a system that could be expanded to cover all of World War I. I think this does two things - it better conveys the specific history of this conflict to players and it creates a more distinct gaming experience.
I have to confess that I’m pretty ignorant when it comes to World War I. I learned about it in school, but I probably know about it more from poetry I studied in English class rather than from my history education. Playing 1914 hasn’t made me an expert on World War I, I’m stilly very far away from being that. However, it has given me much greater understanding of the war’s early phase and really expanded my notion of what the war looked like. Like many people I imagine, I associate the Western Front with trenches. That may not be an entirely inaccurate picture, but 1914 Nach Paris covers the period before the onset of Trench Warfare and shows how dynamic and different the opening of the war was to what most people picture when they think of World War I. Intellectually I knew that the war must have had distinct phases, and I knew that my mental picture of Trench Warfare was an oversimplification, but 1914 helped to fill in an alternative form of warfare to fill out the hazy picture I had in my mind. It’s a long way from understanding the conflict, but it’s a start, and something that probably would have been harder to achieve if the game took a more generic approach to its topic.
I want to say now that I’m no hater of systems. I thoroughly enjoy may of them. I have logged many games of Men of Iron, COIN, and I have an ongoing obsession with Levy and Campaign. That said, when a designer isn’t burdened with mechanics of an existing system, or overly committed to using their mechanics for another game in the future, it can give them the freedom to take their design in interesting ways. I’m not saying every game outside of a system does this, but I would say that 1914 is a great example. As previously established I’m no expert on World War I, but I am also not entirely ignorant of the broader wargaming scene and 1914 really stands out to me as a game with a unique and interesting approach to its subject. If you are a fan of World War I games I doubt you will have played anything like this before.
Some Sort of conclusion
I had a lot of fun with 1914: Nach Paris but also I don’t want to unequivocally recommend it to people. This is a heavy hex and counter game about World War I, if that’s your thing then I think you’ll really enjoy 1914, but if it isn’t I don’t necessarily think that the game is such a radical departure from its form that it will win you over. I don’t usually play hex and counter games this heavy and I don’t play many games on 20th century warfare and I still really liked 1914, but at the same time I do play quite a lot of hex and counter games so I’m already a fan of the overall type of game this is. This is game I have spent a lot of time thinking about and I suspect I will continue to think about it for many months to come. It’s a fascinating design, lovingly presented, and in a box full of gameplay to keep anyone busy for hours and hours.
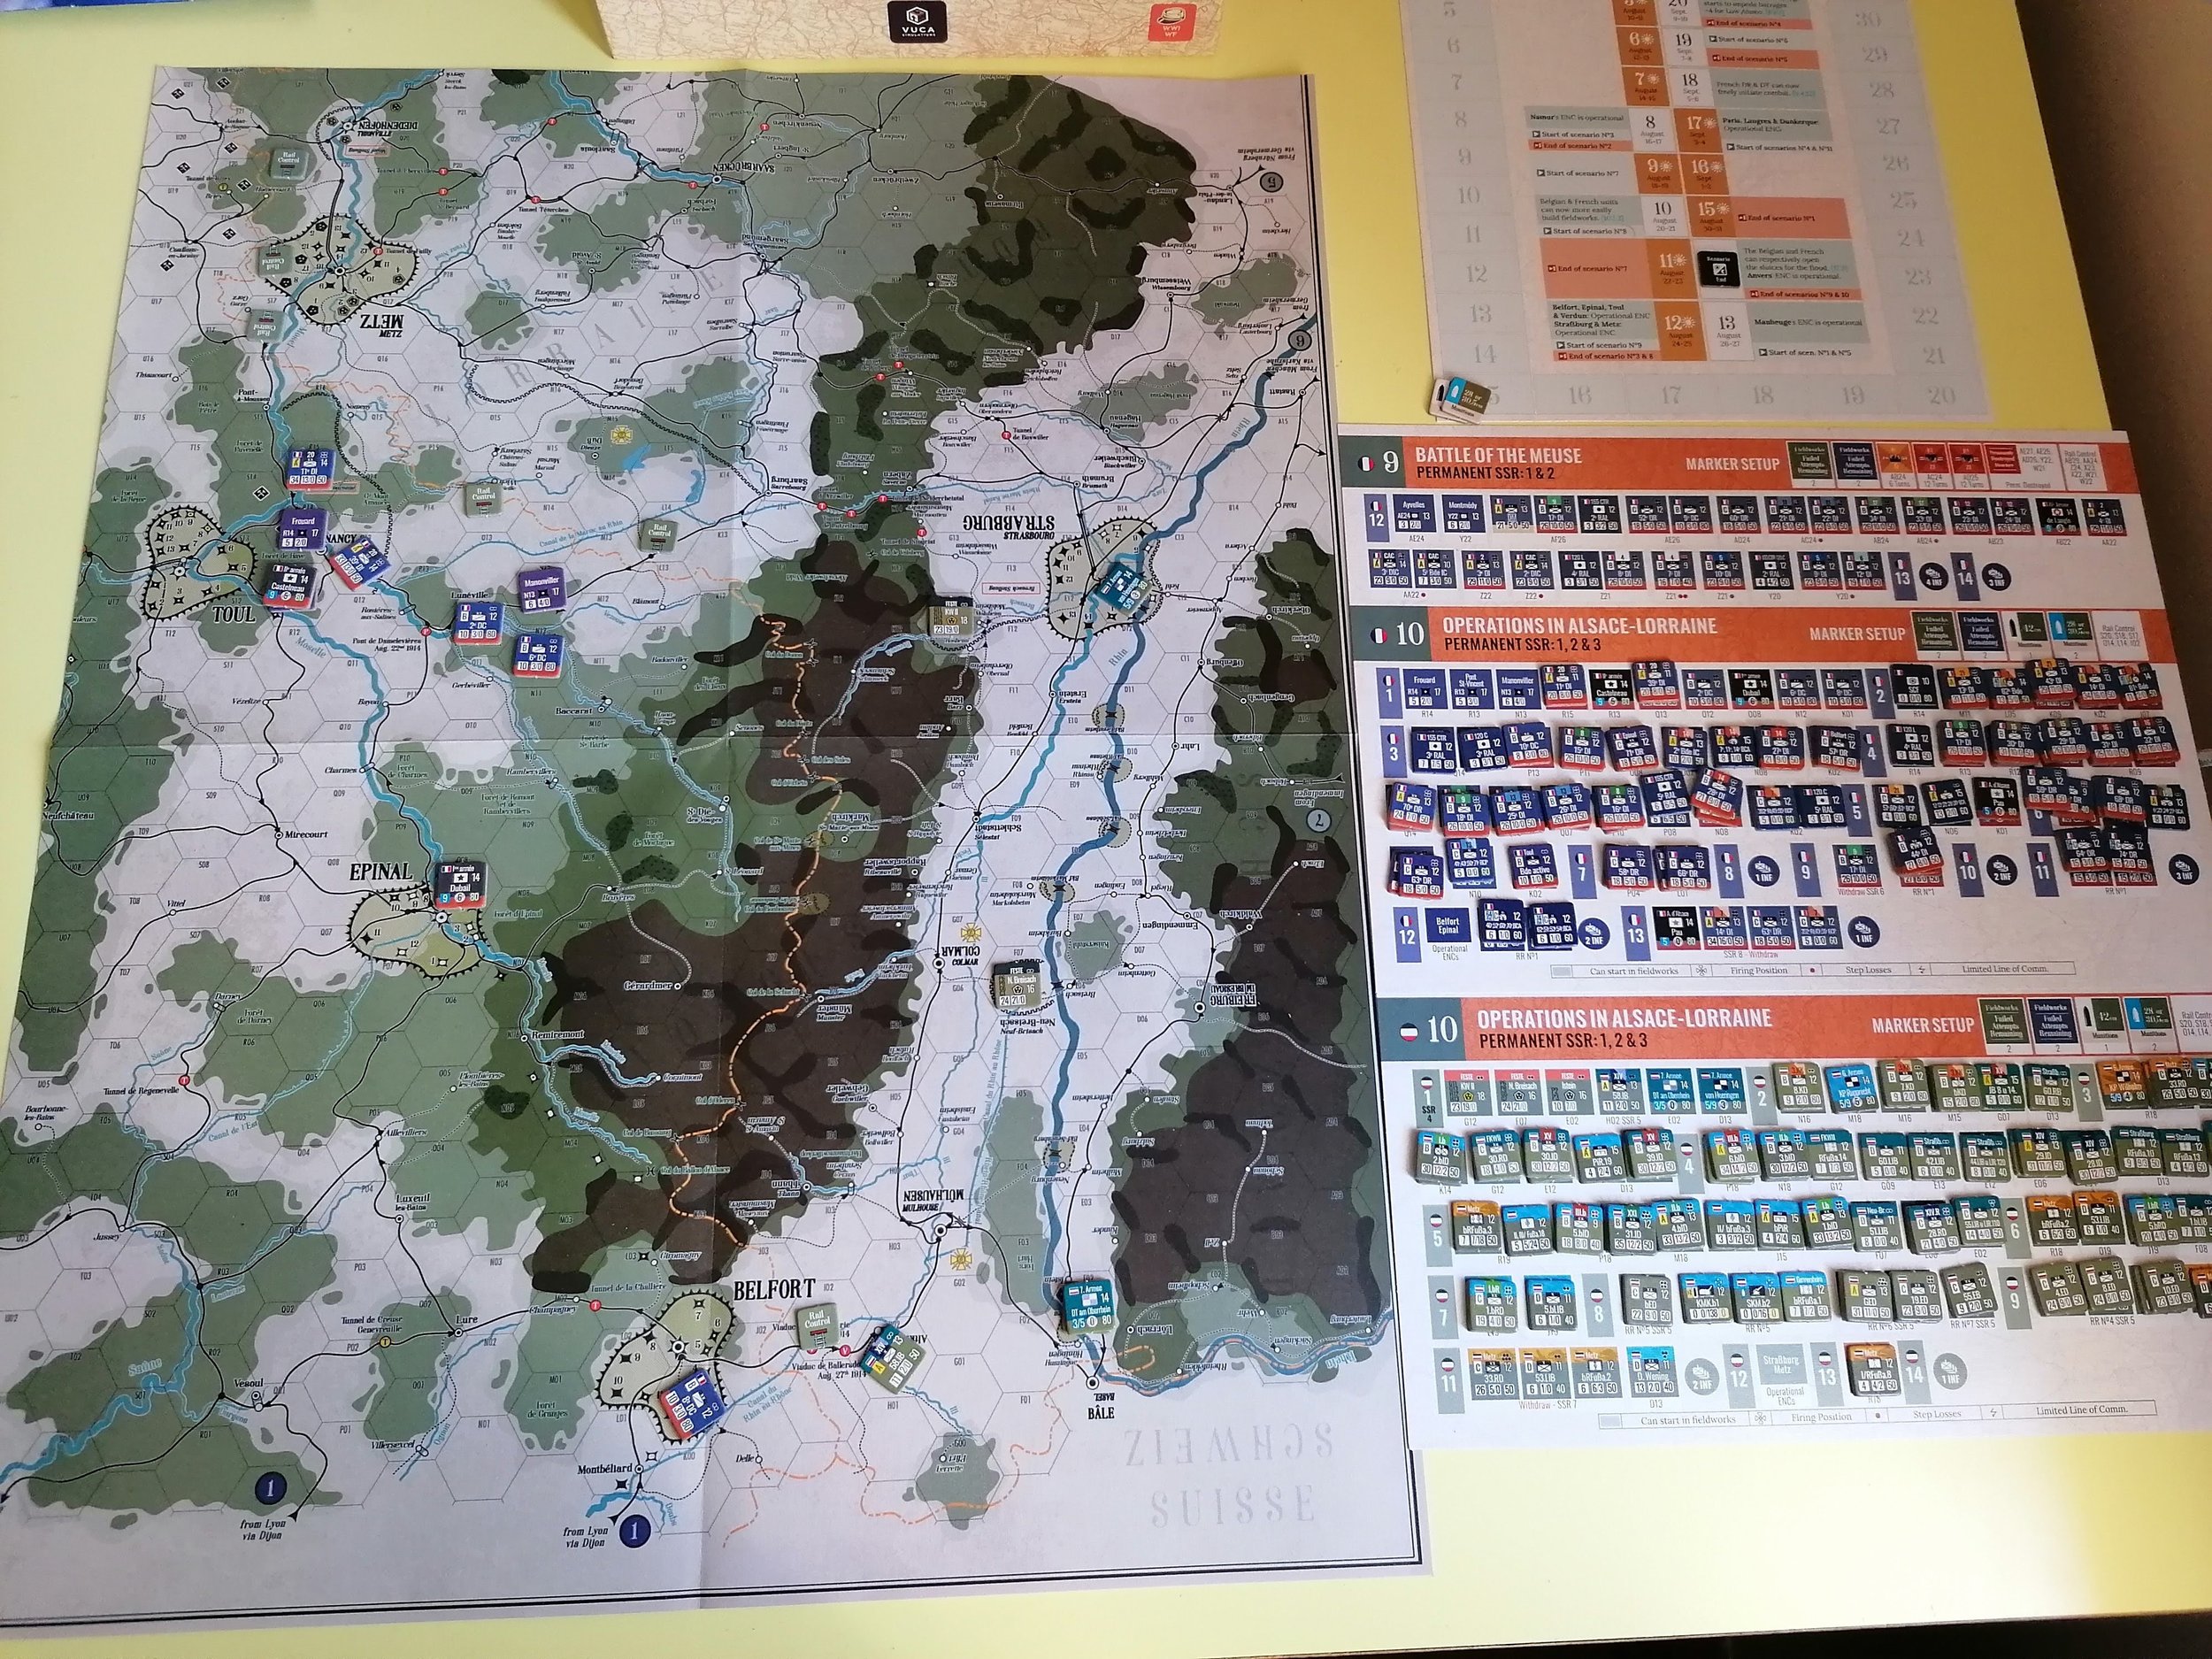
Scenario 10, the first of the larger ones, could keep you busy for quite a long time without being totally overwhelming. I still get a little excited every time I look at this picture.
1914 Nach Paris sits in an interesting place in our gaming landscape. The enormous full campaign scenario is a monster of a game, probably best enjoyed as a convention game played by teams of players (the official rules are all for a two player game, but the box makes clear that it is playable as teams). In contrast, the many scenarios that I played reminded me more of multi-pack games, like the Men of Iron Tri-Pack, where I played plenty of digestible scenarios all using one shared system of rules. While these smaller scenarios helped to teach me the rules, the leap to playing the larger scenarios remained completely daunting. Even beyond the need to know many rules systems I hadn’t fully digested - like the rules for naval movement I frequently forget exist - the larger scenarios also present a far different tactical challenge. The small scenarios have a clear goal and it is just up to me to try and achieve it within a narrow band of geography and time. In contrast, the larger scenarios are an open sandbox with so many possibilities that even knowing where to begin is overwhelming. This is not a criticism, but more a comment that aspects of this box may be for some and not for others, and that it reaches out two potentially different player groups (although they are not without their overlap). I would really like to play the campaign scenario someday, but I also know that my circumstances mean that I probably won’t. I still had plenty of fun approaching this box as more of a series of small scenarios than one grand campaign, but I am well aware that someone else could open up their copy and have a completely different experience of this game if they dive straight into the campaign instead.
In the end, I won’t be keeping my copy of 1914, at least for the time being. I’ve had a lot of fun playing it and I would bet good money that it will be among my most played games at the end of the year. However, it is also an experience I want to share with others, so I will be packing up my copy and passing it on to a friend who I think will enjoy it. The complexity of 1914 means that I know if I put it on my shelf with vague plans to “play it again sometime” it will just sit there gathering dust. Over time I will slowly forget the rules and the barrier to taking it off the shelf again will only grow higher. Far better for me to pass it on to someone who will get joy out of it now than to hope that I will find the time to play it again sometime in the years to come. Who knows, maybe I can convince them to finally play one of those bigger scenarios with me!