![[Malta Month] Preview: Waning Crescent, Shattered Cross by Andy Loakes](https://images.squarespace-cdn.com/content/v1/620919b2fcf26676329427ee/1659644094895-ZE474GH5J0VUB2HF5HDD/Cover.jpg)
Waning Crescent, Shattered Cross (WCSC) is by far the most complex game about the Siege of Malta that I’ve played. This is not a light game to be played in less than an hour. Instead, it is nothing less than the full siege in all its violent glory to be re-enacted over hours of gameplay. WCSC is still in development and Legion Wargames helpfully put me in touch with designer Andy Loakes. Andy kindly shared the draft rules and Cyberboard module being used for playtesting and was even more generous by spending four hours across two weekends to walk me through the game. In that time, we played approximately three weeks of the siege. A full game can last for twenty. That should give some indication of the scale of this experience. I have to say, though, that I had a blast and was engaged the entire time. This is a fascinating game, and I can’t wait to see how it turns out in its final published form.
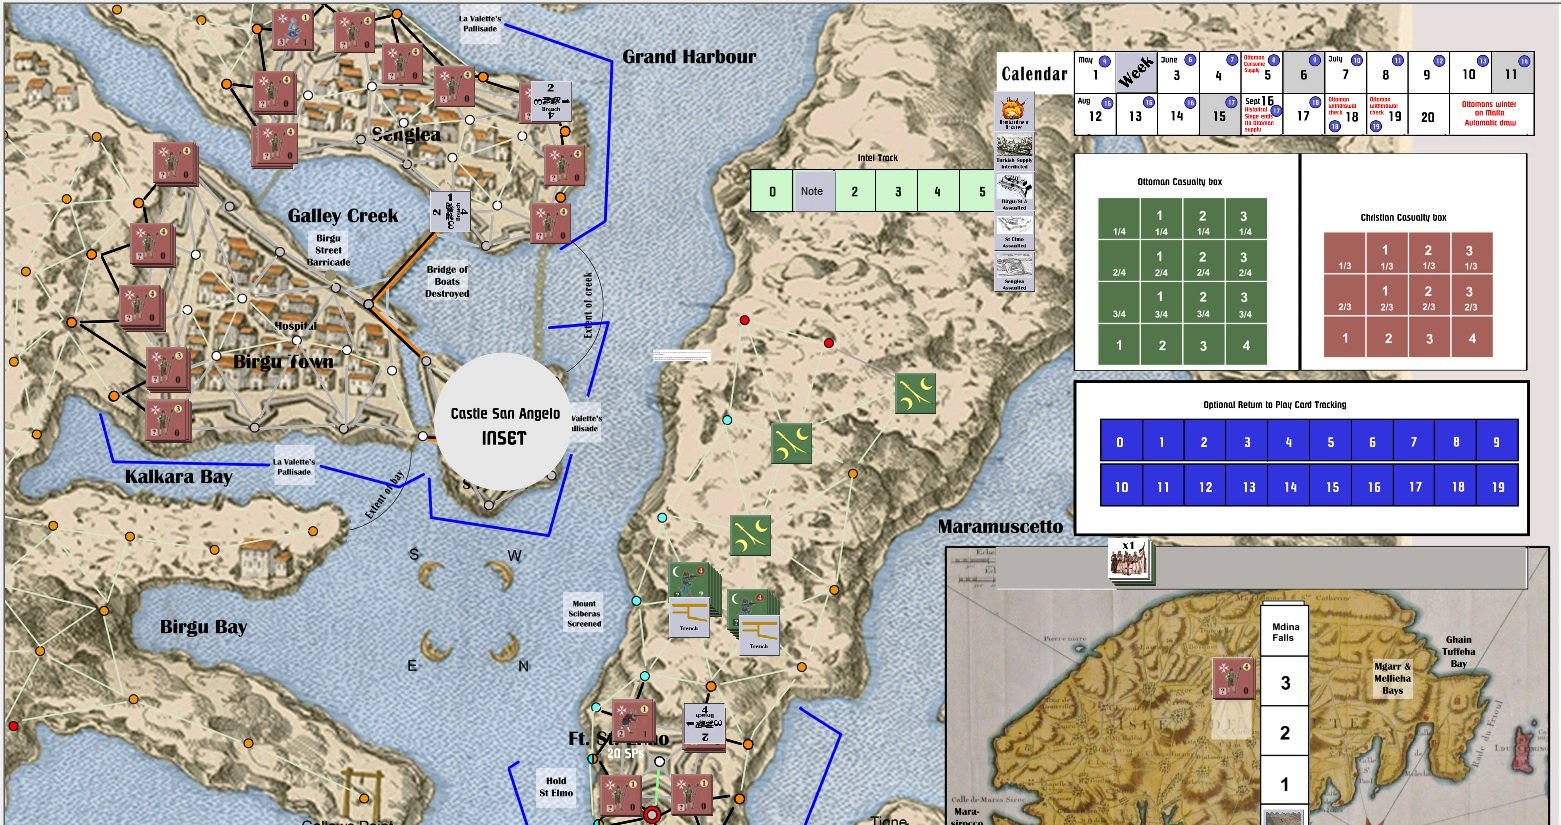
WCSC is very much a game of geography. The main board of WCSC is a point-to-point map of the Grand Harbour including Senglea, Birgu and St Elmo. In the top right corner is a pile of tracks for things like morale, honour, and Ottoman supply. There are also two inset boxes for Mdina and Fort St Angelo. At first read I found the rules for the map quite intimidating. The points are in a variety of colours each with their own rules. Upon playing it, however, I found it quite intuitive. The red points at the edges of the map are where the Ottoman armies can enter play, grey points on top of fortifications obviously represent fortified positions, etc. A few have some specific special rules, for example a series of light blue points along Mt Scibberas are important for establishing whether the Ottomans are screening the harbour preventing the reinforcement of St Elmo, but those only need to come in to play in certain circumstances.

I couldn’t fit the entire board into one image on Cyberboard on my monitor, but here’s the main parts - the three forts and the insets of Mdina and Fort St Angelo. I should also stress that these are all playtest graphics - none of this is is final art!
That really is my impression of the game as a whole: it looked very intimidating at first but was much less complicated than I expected. Don’t get me wrong, this is still by far the most complex game I played this month, but I would say that it’s probably medium complexity for a wargame. There are still a lot of elements to keep track of, such as multiple unit types and the aforementioned tracks, and I expect when playing the final version I will want the rulebook by my side for referencing, but the core gameplay loop is relatively straightforward. On your turn you either play cards for their events or you discard them to take one of a number of actions – usually moving stacks of troops, bombarding walls, making missile attacks on enemy troops, or initiating melee combat. It’s not what I would call simple, but if you’ve played a card driven wargame before a lot of it will be familiar. Even the length, while still impressive, is probably not as bad as my initial play would indicate. Obviously, I was still learning the game and the difficulty of using Cyberboard, a play by email platform, to live play definitely slowed us down a bit, but also the game will probably speed up as you play for reasons I’ll get into later.
But enough of the more generic wargame-y elements of WCSC, let’s get to the good stuff! How does this game model the Siege of Malta specifically? The short version is amazing well, the long version is coming up, so I hope you’re ready!

The Ottomans are tasked with attacking Fort St Elmo first and so deploy two stacks of troops onto the peninsula. Your opponent can only see what is on top of the stack, which creates a subtle fog of war that reveals itself as you fight.
One of the challenges I had long thought would be difficult for a game about the Siege of Malta was how to represent the divisions within the Ottoman strategy. Piali and Mustapha disagreed on the best approach of how to take Malta. Piali’s plan eventually won out despite arguably being the worse option, and history has shown it to have been ultimately unsuccessful. When designing an epic game about the siege how do you account for this? If Piali’s strategy is worse, do you still force the player to execute it or do you design a game where Mustapha’s plan is more viable but risk players never choosing the historic option? The solution in WCSC is so simple I almost feel stupid for how long I’ve been thinking about this question. The Ottoman player is secretly dealt a card from a deck of six which outlines the plan that has been chosen. This deck is weighted in favour of the historic plan but includes two alternatives. The plan takes the form of instructions on the order certain parts of the island must be taken in, e.g. the historic plan requires the taking of St Elmo before assaulting anywhere else. However, the player is not obliged to follow this plan, they can do whatever they want but if they fail to fulfil its requirements, they will lose honour at the end of the game and honour is worth victory points. Players can then choose – if you don’t like the strategy do you discard it in favour of an alternative and just hope that your new plan is effective enough to make up for those lost points? This kind of careful thinking really underpins a lot of the game and it’s what makes it such an interesting representation of the siege.
For our game we played the historic strategy, partly because it is the classic scenario and in part because it largely ignores Mdina. This latter point is important because the rules for sieging Mdina, which are much more abstracted than the other locations, are being significantly revised and tested and it was simpler for our demo game if we just left it alone. I am very much looking forward to seeing how they develop in the final game, though.

The Ottoman attack begins - this may look quick but it took me three cards to move this far as I could only move one point each turn. However, I placed Ottoman control markers behind me which means that any troops that follow my path can move across those spaces for free - I’ve secured ground making it easier to bring more troops forward.
I found the core gameplay of each turn really engaging and as the Ottoman player I thought Andy did a great job of capturing the feeling of not having enough time to prosecute the siege. Starting with the Ottoman player, players take it in turns to first draw as many cards as they want and then to play as many cards as they want to take actions. Once a player has run out of cards or passes then their opponent repeats the process. There are two very important wrinkles that make this system work. The first is that you can’t draw any more after you start playing cards, so you can’t draw a card, play it, draw another, etc. The second is the End of Week cards.
Bringing the second set of Ottoman troops forward was much faster. I then entrenched both forces - a necessary stage before I could begin bombarding the walls with my basilisk and my cannon. The Ottomans have a limited amount of artillery to bring to bear, and if they are captured by a Christian counter attack I could lose them forever so I don’t want to risk exposing them any more than necessary. Walls can be Breached on a level between 1 and 8 - you need to create a very large breach to attack between and until they are nearly totally destroyed the Christians can try and repair them.
If the Ottoman player draws an End of Week card, then an End of Week phase must be resolved, including both players discarding down to 4 cards in hand and shuffling the discard back into the deck. More importantly, though, is that the tracker representing the progress of the siege moves forward one week – bringing it slowly closer to its conclusion. This creates an element of push your luck as the Ottoman Player obviously wants a lot of cards in hand to have a big turn but must avoid those End of Week cards. Some cards are removed from the deck permanently through play over the course of the game, so as the game progresses the deck will become thinner, and those End of Week cards are likely to come up more often. This gives the game the potential to accelerate towards its conclusion in the later weeks.
The Christian player also wants to avoid End of Week cards to some extent – only End of Week cards marked with a Maltese cross affect them, so the chances of triggering an End of Week are lower for them. Still, because the Ottoman player always go first drawing End of Week causes both players to potentially discard cards and then play switches back to the Ottomans. The Christian End of Week also doesn’t progress the week tracker, though, so the Christian player can’t just keep drawing cards to try and accelerate the end of the game.
In addition to pushing the temporal element of the siege to the front and centre in the gameplay, the End of Week cards also represent an interesting element of the historic siege. Some weeks not very much seems to have happened. Successfully prosecuting a siege is a logistical nightmare and some weeks the Ottomans just got bogged down and didn’t get very much done This mechanic creates some great tension in planning your strategy and captures that ebb and flow of a massive siege like Malta.

End of the First Week, some serious bombardment has happened but it still feels like I didn’t do enough given how few weeks it feels like I have. I also managed to increase Ottoman intelligence (track above Mt Scibberas approach) due to the Christians resupplying Fort St Elmo - this is one of two necessary elements to allowing me to screen the harbour and prevent any future reinforcement of the fort.
Combat is also utterly lethal in ways I found very interesting. Ranged combat seems to be more of a mixed bag, taking pot shots with arquebuses keeps your troops relatively safe but may not inflict much harm - particularly for the Ottomans shooting at the more heavily armoured Christians. The real meat of the fighting is in melee – storming walls if you’re the Ottomans or pushing attackers back out of breaches if you’re the Christians. Combat resolution is done via a relatively straightforward Combat Results Tables (CRT) with column shifts based on a number of factors. I’m honestly not much of a fan of CRTs. I like the immediacy of being able to determine results just from the dice, but it’s impossible to get the same level of detail out of a dice only system. I appreciate that the CRTs for WCSC are relatively light on modifiers – you won’t find yourself having to calculate six different elements all of which slightly impact the roll. Instead you work out the rough ratio of troops and then check a few modifiers that cause column shifts. Once you’ve determined the relevant column both players roll using the Attacker and Defender results within that column.
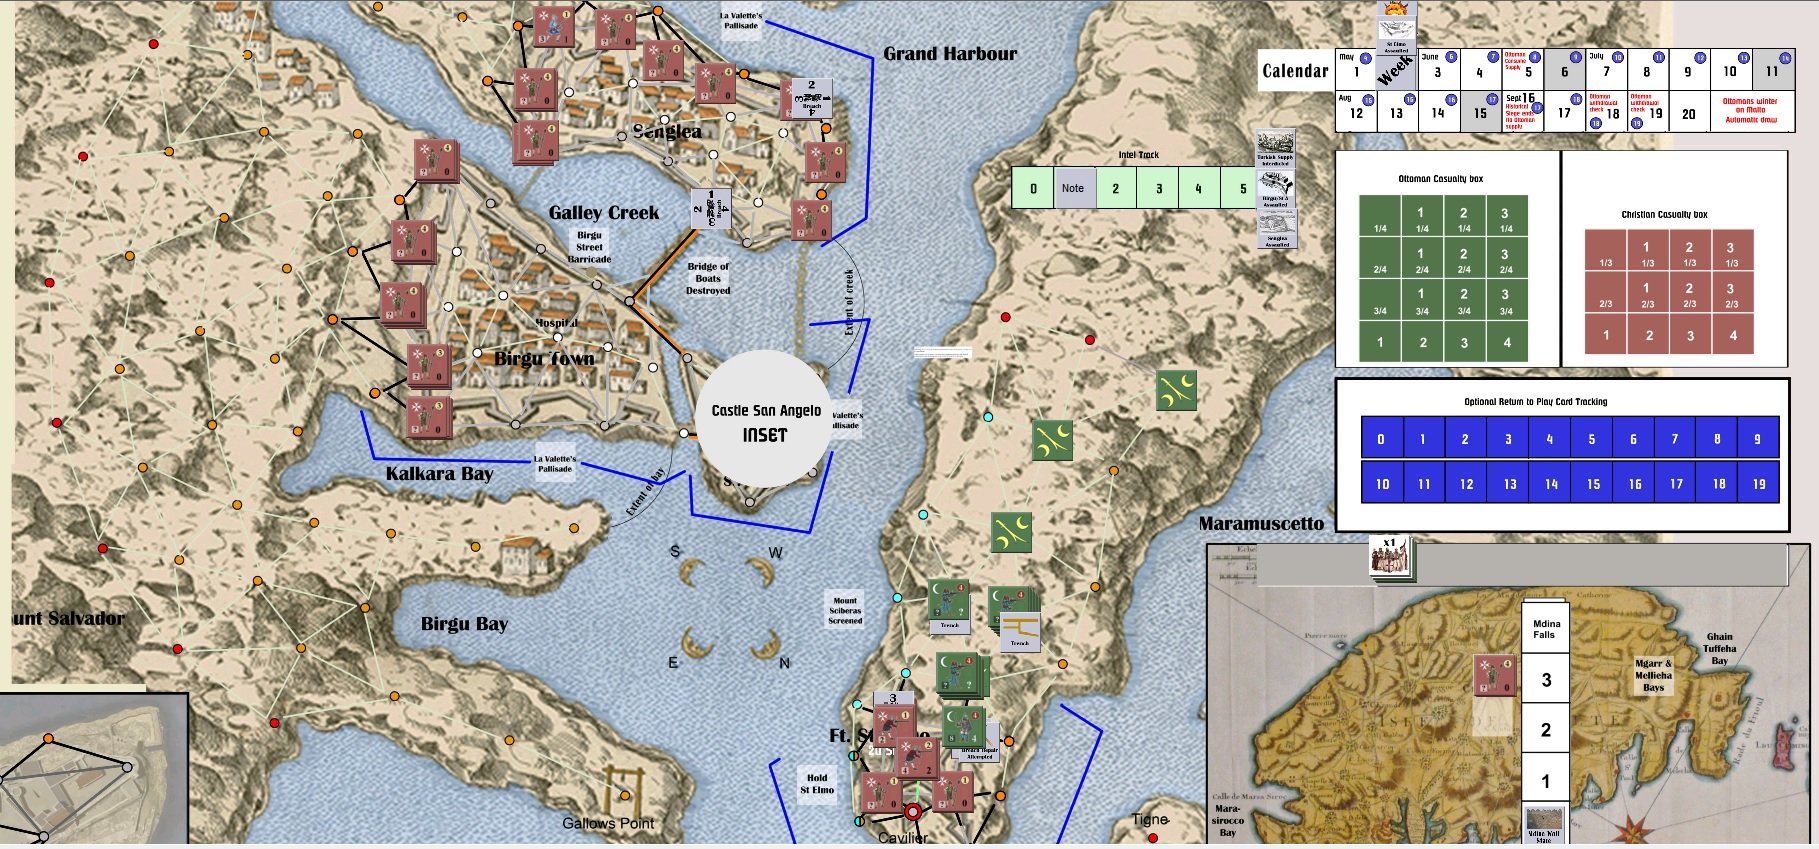
The Ottoman assault on Fort St Elmo begins…kind of. I actually used an Event to displace the Christian troops on that wall section and just marched into the breach - but technically I did start the assault. Now if I fail to take the fort within 5 weeks I will risk losing Morale - this was supposed to be a cakewalk. I’m also limited in how many troops can occupy a Breach so only a fraction of my stack has moved forward.
What I really appreciate is how dangerous combat is for everyone involved. Even on the most unbalanced CRT column, a 5:1 ratio in favour of the attacker, the defender will still inflict casualties 50% of the time. I also really like the system for determining the size of a combat. You calculate the size of the smaller force in terms of overall strength points, i.e. how many troops are present, and that determines how many dice are rolled in combat for both sides. This means that the bigger the fight the more casualties on both sides. I haven’t played enough games to know if this is fairly standard in more complex games with CRTs but it was new to me and I think does a great job of capturing the carnage of combat during the Siege of Malta. In our first combat in a breach my Ottomans were decisively driven back, suffering twice as many casualties as I inflicted – but at the same time I had twice as many troops to lose and I removed one Strength Point worth of Hospitallers (representing approximately 50 knights) to the Walking Wounded chart. These units are in short supply on the Christian side so I probably came out ahead despite my higher losses. This moment felt like the siege to me, throwing away troops I didn’t care about (no Janissaries were included in this assault, I risk losing honour should they retreat from an attack) to grind down the Christians much more limited supply of men.

The Christian counter attack eliminates my initial attack, but we take some of them with us and troops are more precious to them. You can see on the right where losses are tracked - some losses will return to the battle later as they recover but it is a slow process.
Waning Crescent, Shattered Cross really felt like the ideal distillation of the Siege of Malta. It’s not entirely without its drawbacks. As a complex game that probably takes most of a day to play it’s not something I’d likely get to the table very often, but I don’t think I’d need to. For many people this game will be too big and too long and they will have a much better time with one of the other games I reviewed this month – but for me and what I want out of replaying the 1565 siege this seems like the ideal game and I cannot wait for its eventual release.